Recently I reorganized my pottery studio and made a few changes. I thought it might be helpful for others who also have a at-home pottery studio. I hope these would help you re-think some of the designs of your studio to make it 1% more efficient than before.

1. Add wheels on things
This is one of the best tips I saw from a photographer who works from home. She put wheels on all her furniture so she can easily rearrange them in her house in order to either make room or place backdrop in the way she wants.
These wheels are called "caster wheels", you can find them in hardware stores like Home Depot or online. They usually come with weight limits so make sure you buy the wheels with enough weight bearing than what you intend it to be.
2. Use kitchen plastic wrap to prevent glaze from drying
When I first started collecting glazes, some of these underglaze come in small jars and I find they dry out rather quickly, and I also don't like how when I shake the glaze, it gets onto the inside of the cap and when you open it, the glaze gets everywhere and messy. So I started saran wrap the inside of the wrap like you would if you had soup or spill-able food item. It has worked great so far! Definitely not foolproof but extend the life of the underglaze & glaze much longer.
3. Sit next to light / window
This might be a preference but I am very much like a plant. I love being showered with sunlight and get gloomy in winters when sunlight is shorter. I realized in my old studio, I used to dread doing anything while I face the wall, be it handbuilding, or throwing, or work. In the new studio, I put my wheel and handbuilding table next to the big window so I can see outside & enjoy the sunlight while working on my pottery. This has made me want to go into my studio more and do a little bit of pottery any time of the day.
4. Limit shelving space
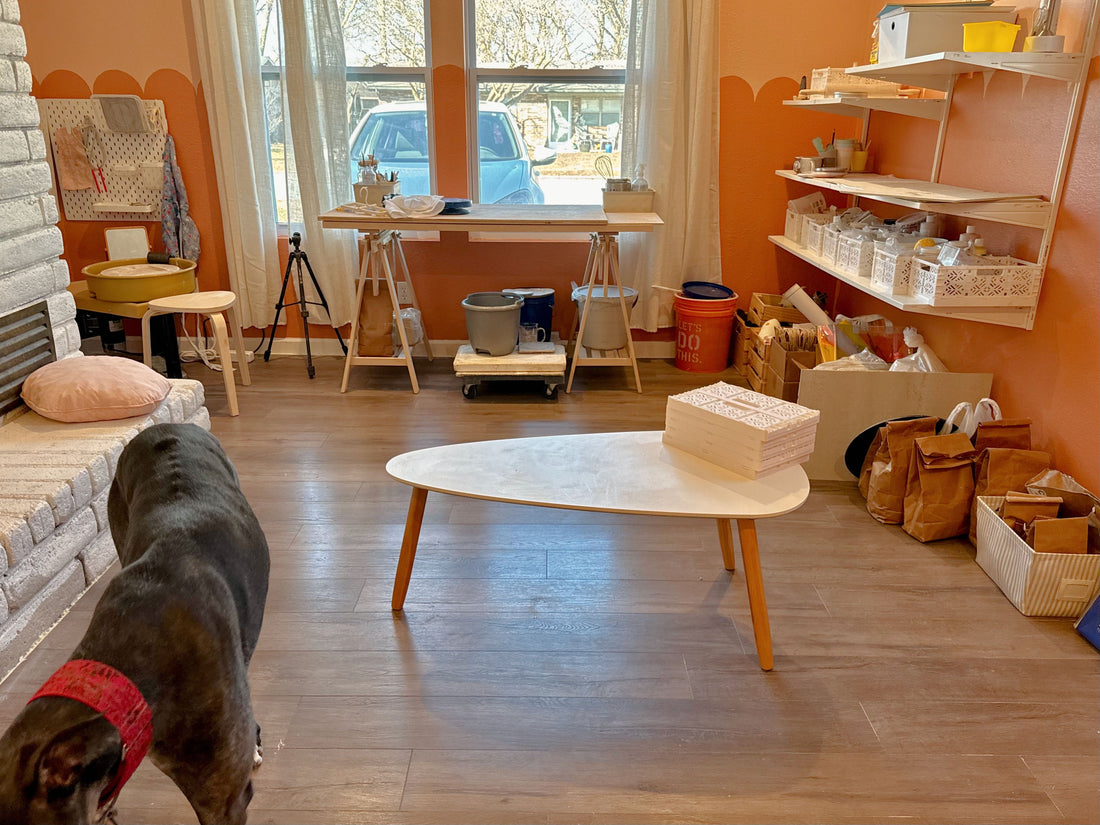
When I first started building my pottery studio, I browsed a lot of other online resources to gather all their wisdom for mine. One of the most resounding agreement online was to have as much shelf space as you possibly can because you will run out of space. So in my old studio, I dedicated a whole wall (12 x 9) into shelf space to use as storage.
After using the studio for a year, I find that I am constantly tidying the shelves, realizing I have a lot of organizing and cleaning to do. I don't enjoy working on my art when my environment is messy so I avoid trying to see that wall of clutter. When I redesigned this studio, I limited the shelves to 1/4 of what I used to have. Surprisingly, I fit all my essential tools on there, and have a top shelf for display. This reminds me of the saying in fashion that you will always expand your clothes to fit into your closet, so if you have a bigger closet, you may accidentally buy more clothes. Being a minimalist-wanna-be, I enjoy having less shelf space than more so it is more manageable and eaiser to clean.
5. Frequently declutter
One of the things I do every 3 months or so is to look around my studio and gather things I haven't used to see whether I still need them or if I have grown out of them. Things such as used glaze test tile, failed ceramic pieces, broken tools, random supplies I used and never returned, and glazes that have dried and not been used in a while.
This gives you a chance to re-evaluate where your creation is taking you, and you can donate extra supplies to your local pottery studio or school.
6. Keep tools within reach
In my prior studio, I had gotten one of the most popular iconic IKEA pegboards, and I stacked them vertically on the wall above my wheel because that looked most aesthetic. However, I never ended up using the top pegboard because reaching over my wheel to get to that board is almost impossible. So I had random pieces of notes and tools I never use hanging on the board.
In the new studio, I placed the same pegboard horizontally so both boards will be within my reach while sitting at the wheel so I can display my tools on the wall next to the wheel.
7. Recycle your clay
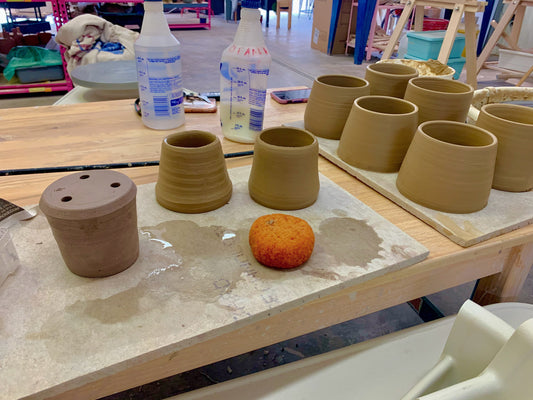
One of the money saving things I picked up early on was to recycle the used clay. Most people do in their studio anyway. I think what I learned from the last two years of recycling clay is two things, 1) use an emerging blender to blend up the clay before putting it onto the plaster board to dry, to ensure that the clay is mixed and no chunks of unevenness before the drying starts. This makes wedgeing the clay much easier later on. 2) if you don't like throwing with the hand recycled clay because it's not as evenly as the commercial clay that comes from a bag, you can always use it to handbuild.
8. Use tray to gather clutter
Pottery studio always somehow generate clutter, from all the tools I steal from my kitchen, to fancy tools I purchase online specifically for ceramics. I found that gathering the clutter of tools into trays / buckets / jars and organize them help me cut down on the visual clutter of the studio, therefore gives me a more relaxed feel when I first walk into my studio to settle down.
9. Put inspiration where visible
This is something that's easy to do but I never prioritized before. But as I work more in my own studio, I find that it really helps when you walk in, the first thing you see is the vision board or inspirations because well, I am a ceramicist so visual and find art are something that I am drawn to, so having vision boards & visual inspiration is much more impactful & effective for my brain. I am making a pin-board from foam board I got from Walmart wrapped in linen fabric here and then I can pin my favorite postcards & inspo on here.
10. Clean as you go
Another task that becomes unmanageable in my studio is the cleanliness. Clay dust dries on surfaces like the table, the wheel, tools, the floor, the walls, the apron, etc. And the best way I found to keep this giant beast of task down is to clean as you go. Finished throwing? wipe the wheel head & the splash pan. Finished with the tools, wipe them off and put them back. When I was working out of the community studio, we would clean everything afterwards and put the tools & buckets back to its designated places. And this gave me a good habit of how I end my ceramic studio time. My other friends are always amazed how clean I keep my studio and sometimes when I visit theirs, I start tidying up without noticing myself doing it. Not only does it feel good to come back the next day into a cleaner studio, but it is also good for our health to keep the studio clean and with minimal dust.
What is something that has helped in your home studio? Share in the comments!